Difficulty: Easy
Skill Level: Beginner
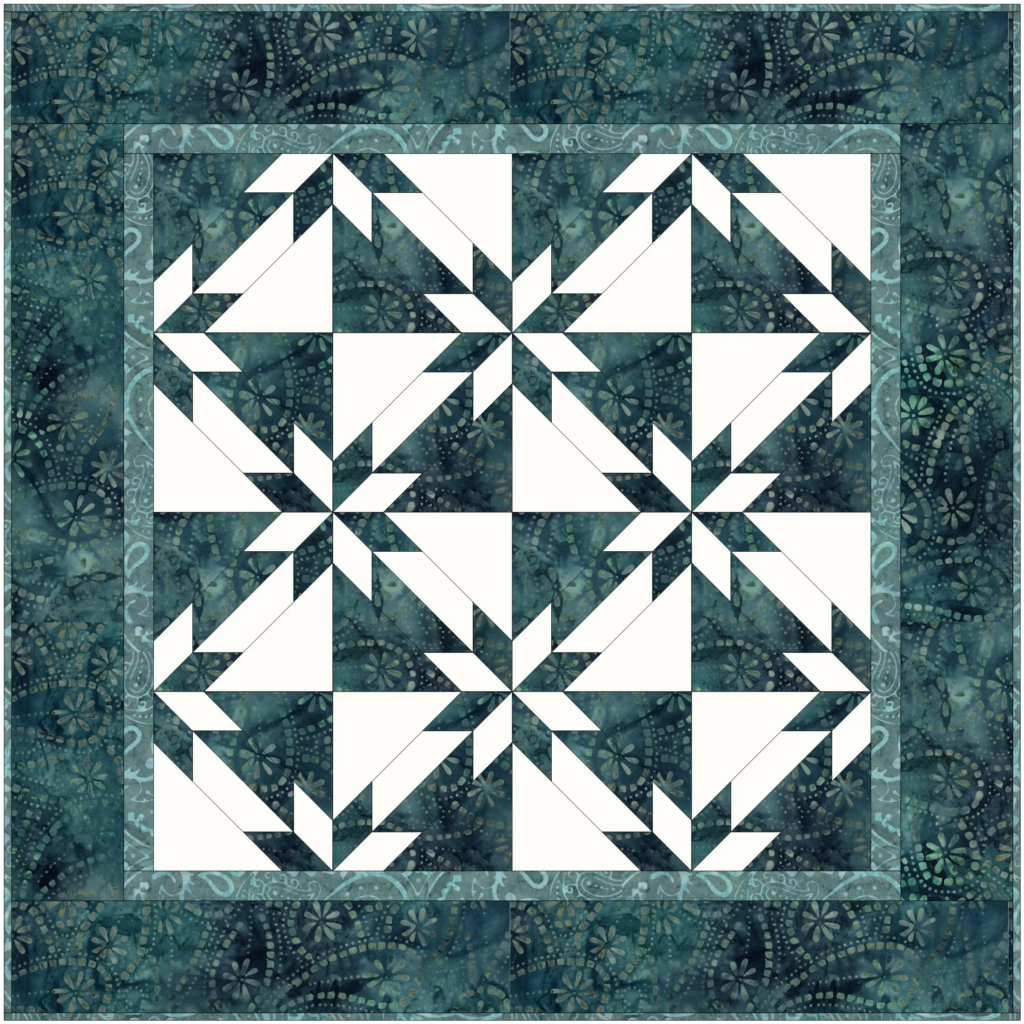
Hunter’s star quilt is a traditional quilting technique that makes use of diamonds and square shapes to create a star pattern. The stunning visual appearance and complexity of this quilt pattern is what makes it a popular choice.
The original hunter’s star quilt was actually designed with diamond shapes, but creating the same look with half-square triangle blocks is more easier. So, I’m gonna show you the easy way! The quilt finishes at about 72 by 84 inches. You can add borders or more quilt blocks to make it bigger.

Choosing the Fabric
Pick fabrics with light and dark colors. The way you see light and dark colors might differ from someone else’s starting point, but that doesn’t really matter. It’s your choice.
Don’t worry if the dark and light fabrics don’t match in a scrap quilt. The overall contrast in the finished blocks is what matters, and the contrast can vary when assembling scrap quilts. You can also use warm colors, such as yellow, orange, and red, just as much as dark fabrics, like black, or cool colors, like blue.
Note: Even if you make a quilt with a lot of dark fabrics, use the light fabric throughout to keep things flowing.
Things You’ll Need
Materials
- 4 yards dark fabric
- 4 yards light fabric
- 1 panel quilt backing (82 x 94 inches)
- 1 panel quilt batting (82 x 94 inches)
- 340 inches continuous double-fold binding
Equipment / Tools
- Sturdy white thread, adhesive products, baste spray, safety pins or anything you can use to baste the quilt
- Rotary Cutter
- Long straight pins
Instructions
1. Cut the Individual Units
I think the Magic 8 method for half square triangles (HST) works great for hunter’s star quilts, even scrappy ones because each patchwork section takes eight half square triangle units.
Cut 42 7 3/4-inch by 7 3/4-inch light squares, then 42 7 3/4-inch by 7 3/4-inch dark squares and pair each piece of light fabric with a piece of dark fabric to get eight 3 1/2-inch by 3 1/2-inch HSTs per pair (336 total).
2. Sew the Hunter’s Star Quilt
Grab four HSTs, and arrange them into two rows, as shown in Figure 1 (left). Use straight pins as needed to keep matched seams from shifting. Pay close attention to the orientation of triangles when you make the small patchwork units. Sew the units in each row together and press the seam allowances in adjoining rows in opposite directions.
Join the rows and press either direction, as shown in Figure 1 (middle). The joined HSTs should measure 6 1/2 inches by 6 1/2 inches. Sew a 6 1/2-inch light square to the right-hand side of the HST patchwork, as shown in Figure 1 (right). Press seam allowance toward the plain square. Make a total of 42 rows with light 6 1/2-inch squares.
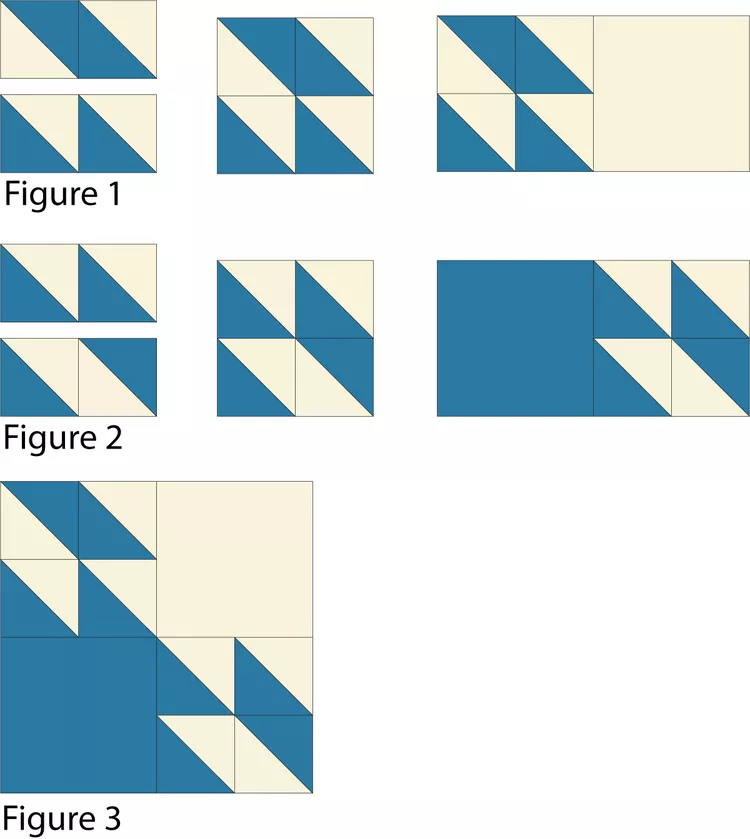
3. Make the Figure Patchwork Unit
Arrange four HST units into two rows as shown in Figure 2 (left). Sew the units in each row together. Press seams in adjoining rows in opposite directions. Join the rows, as shown in Figure 2 (middle). Press to make a patchwork unit that measures 6 1/2 inches by 6 1/2 inches.
Sew a matching (or scrappy) 6 1/2-inch square to the left side of the patchwork, as shown in Figure 2 (right). Press the seam allowance toward the plain square. Make 42 patchwork units in the same configuration. Join the two rows, as shown in Figure 3. Press seam either way. The new block should measure 12 1/2 inches by 12 1/2 inches.
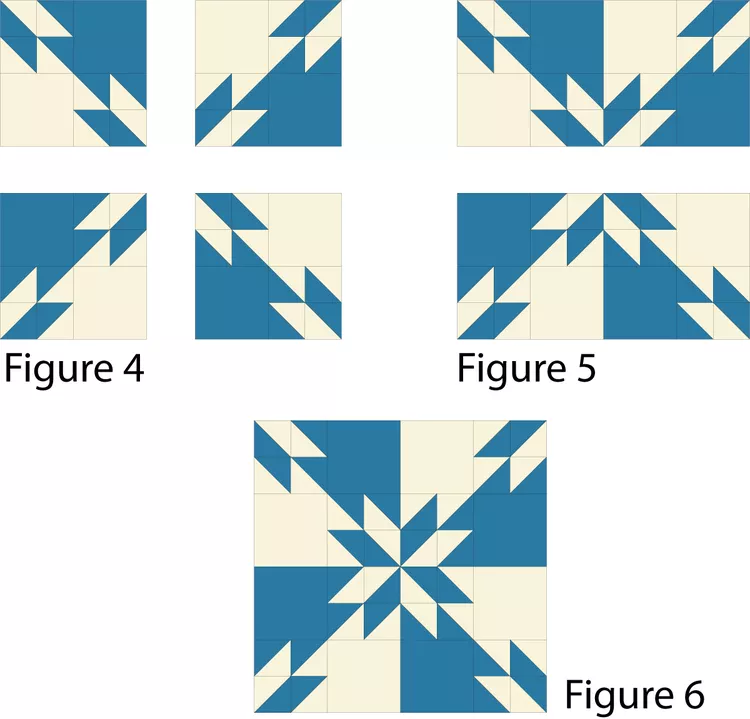
4. Assemble a Cluster of Four Blocks
Gather four of your 12 1/2-inch square blocks and arrange them into two rows as shown in Figure 4. Sew the two blocks in each row together, as shown in Figure 5. Press the seam allowances toward the blocks with darkest edges.
Join the two rows and press the seam allowance in either direction, as shown in Figure 6. The large quilt block should measure 24 1/2 inches square.
Make a total of nine large quilt blocks. You should have six of the 12 1/2-inch block sections left.
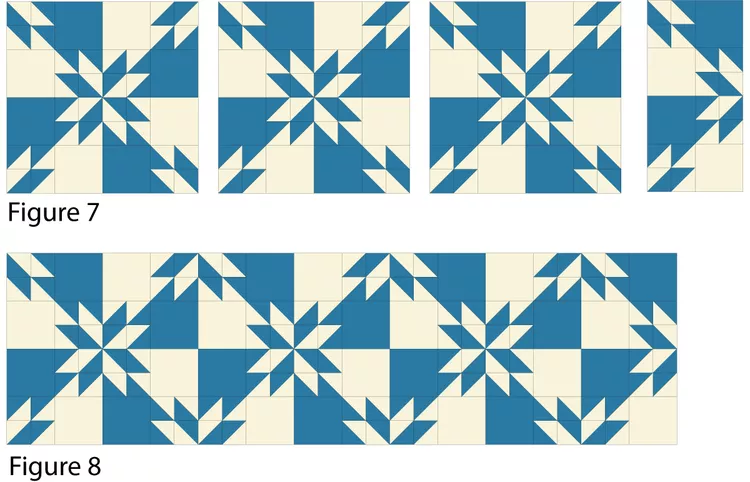
5. Sew the Rows to Finish the Quilt
Take a look at the right end of Figure 7. That narrow unit is two of the remaining smaller blocks. Sew together in pairs as shown and press towards the dark. Sew three of the large blocks together side by side and add the narrow unit to the end. Repeat the process to make two more rows. Press new seam allowances in adjoining rows in opposite directions and join the rows.
After that, sandwich the quilt top with the batting and backing and sew the quilt. Once sewing is done, trim away excess batting and backing except for the quarter inch seam allowance. Finally, bind the quilt using any binding method that looks easy or follow our machine binding tutorial for step-by-step instructions.
Tips: You can add five more 6 1/2-inch by 12 1/2-inch sections to make three rows of the larger blocks and increase the size of the quilt. If you like that look, make the sections and assemble blocks the same way.
Leave a Reply